

You will need:
Fabric 120 cm wide
EU 32-40/UK 4-12/US 0-8: 3 m
EU 42-46/UK 14-18/US 10-14: 3.45 m
EU 48-50/UK 20-22/US 16-18: 4.25 m
EU 52-54/UK 24-26/US 20-22: 4.55 m
Fabric 140 cm wide
EU 32-40/UK 4-12/US 0-8: 2.55 m
EU 42-46/UK 14-18/US 10-14: 3.1 m
EU 48-50/UK 20-22/US 16-18: 3.5 m
EU 52-54/UK 24-26/US 20-22: 3.8 m
Pocket lining 0.6 m
Interfacing 1.25 m
7 Buttons - approx. 2-2.5 cm in diameter.
Thread
No. 33 Lissabon - Version 1
Double-breasted Spencer dress with pockets. The dress closes with buttons and a waist tie.
Fabric choice:
Medium weight woven fabric: cotton, silk, wool, viscose, cupro, linen or polyester. Not suitable for jersey.
Find Your Size:
Take your measurements according to the measurement chart. Choose the size closest to your measurement. Print the measurements chart here.

Fitting:
We recommend that you always make a muslin before you cut the fashion fabric, to make sure your finished garment will fit you perfectly.
Cutting Fabric
On each pattern piece, you will find a capital letter. On the cutting layout plan, you will find the same capital letters so that you can easily see which pattern pieces to use for the view you have chosen.

YOU WILL NEED THE FOLLOWING PATTERN PIECES:
A, B, C, D, E, F, G, H


Sewing
NOTE! The Pattern Has 1 Cm Seam Allowances Included Unless Otherwise Noted.
1. Cut all pieces in fabric, pocket lining, and fusible interfacing. Remember to mark all notches and markings to your fabric. see video
2. Press fusible interfacing onto:
Interfacing pieces E and F (facings).
Stay tape along the neckline edges of the front (A) and back (D) pieces.
Stay tape along the neckline edges of the facings (E and F), over the interfacing.
Stay tape along the pocket opening edges on the front (A).
Apply a small square (approx. 2 x 2 cm) of interfacing at the corners of the front (A).

3. Sew the front darts (A) right sides together, matching notches and markings. Press the darts towards the center front to form pleats at the waistline.

4. Sew the back neck darts (D) right sides together, matching notches and markings.
5. Clip the dart’s center to 1.5 cm from the pivot point (dart point)
6. Press dart open.
7. Apply a small piece of interfacing over the dart point for reinforcement.

8. Sew the back waist darts (D) right sides together, matching notches and markings. And press towards the center back.
SEW THE POCKETS
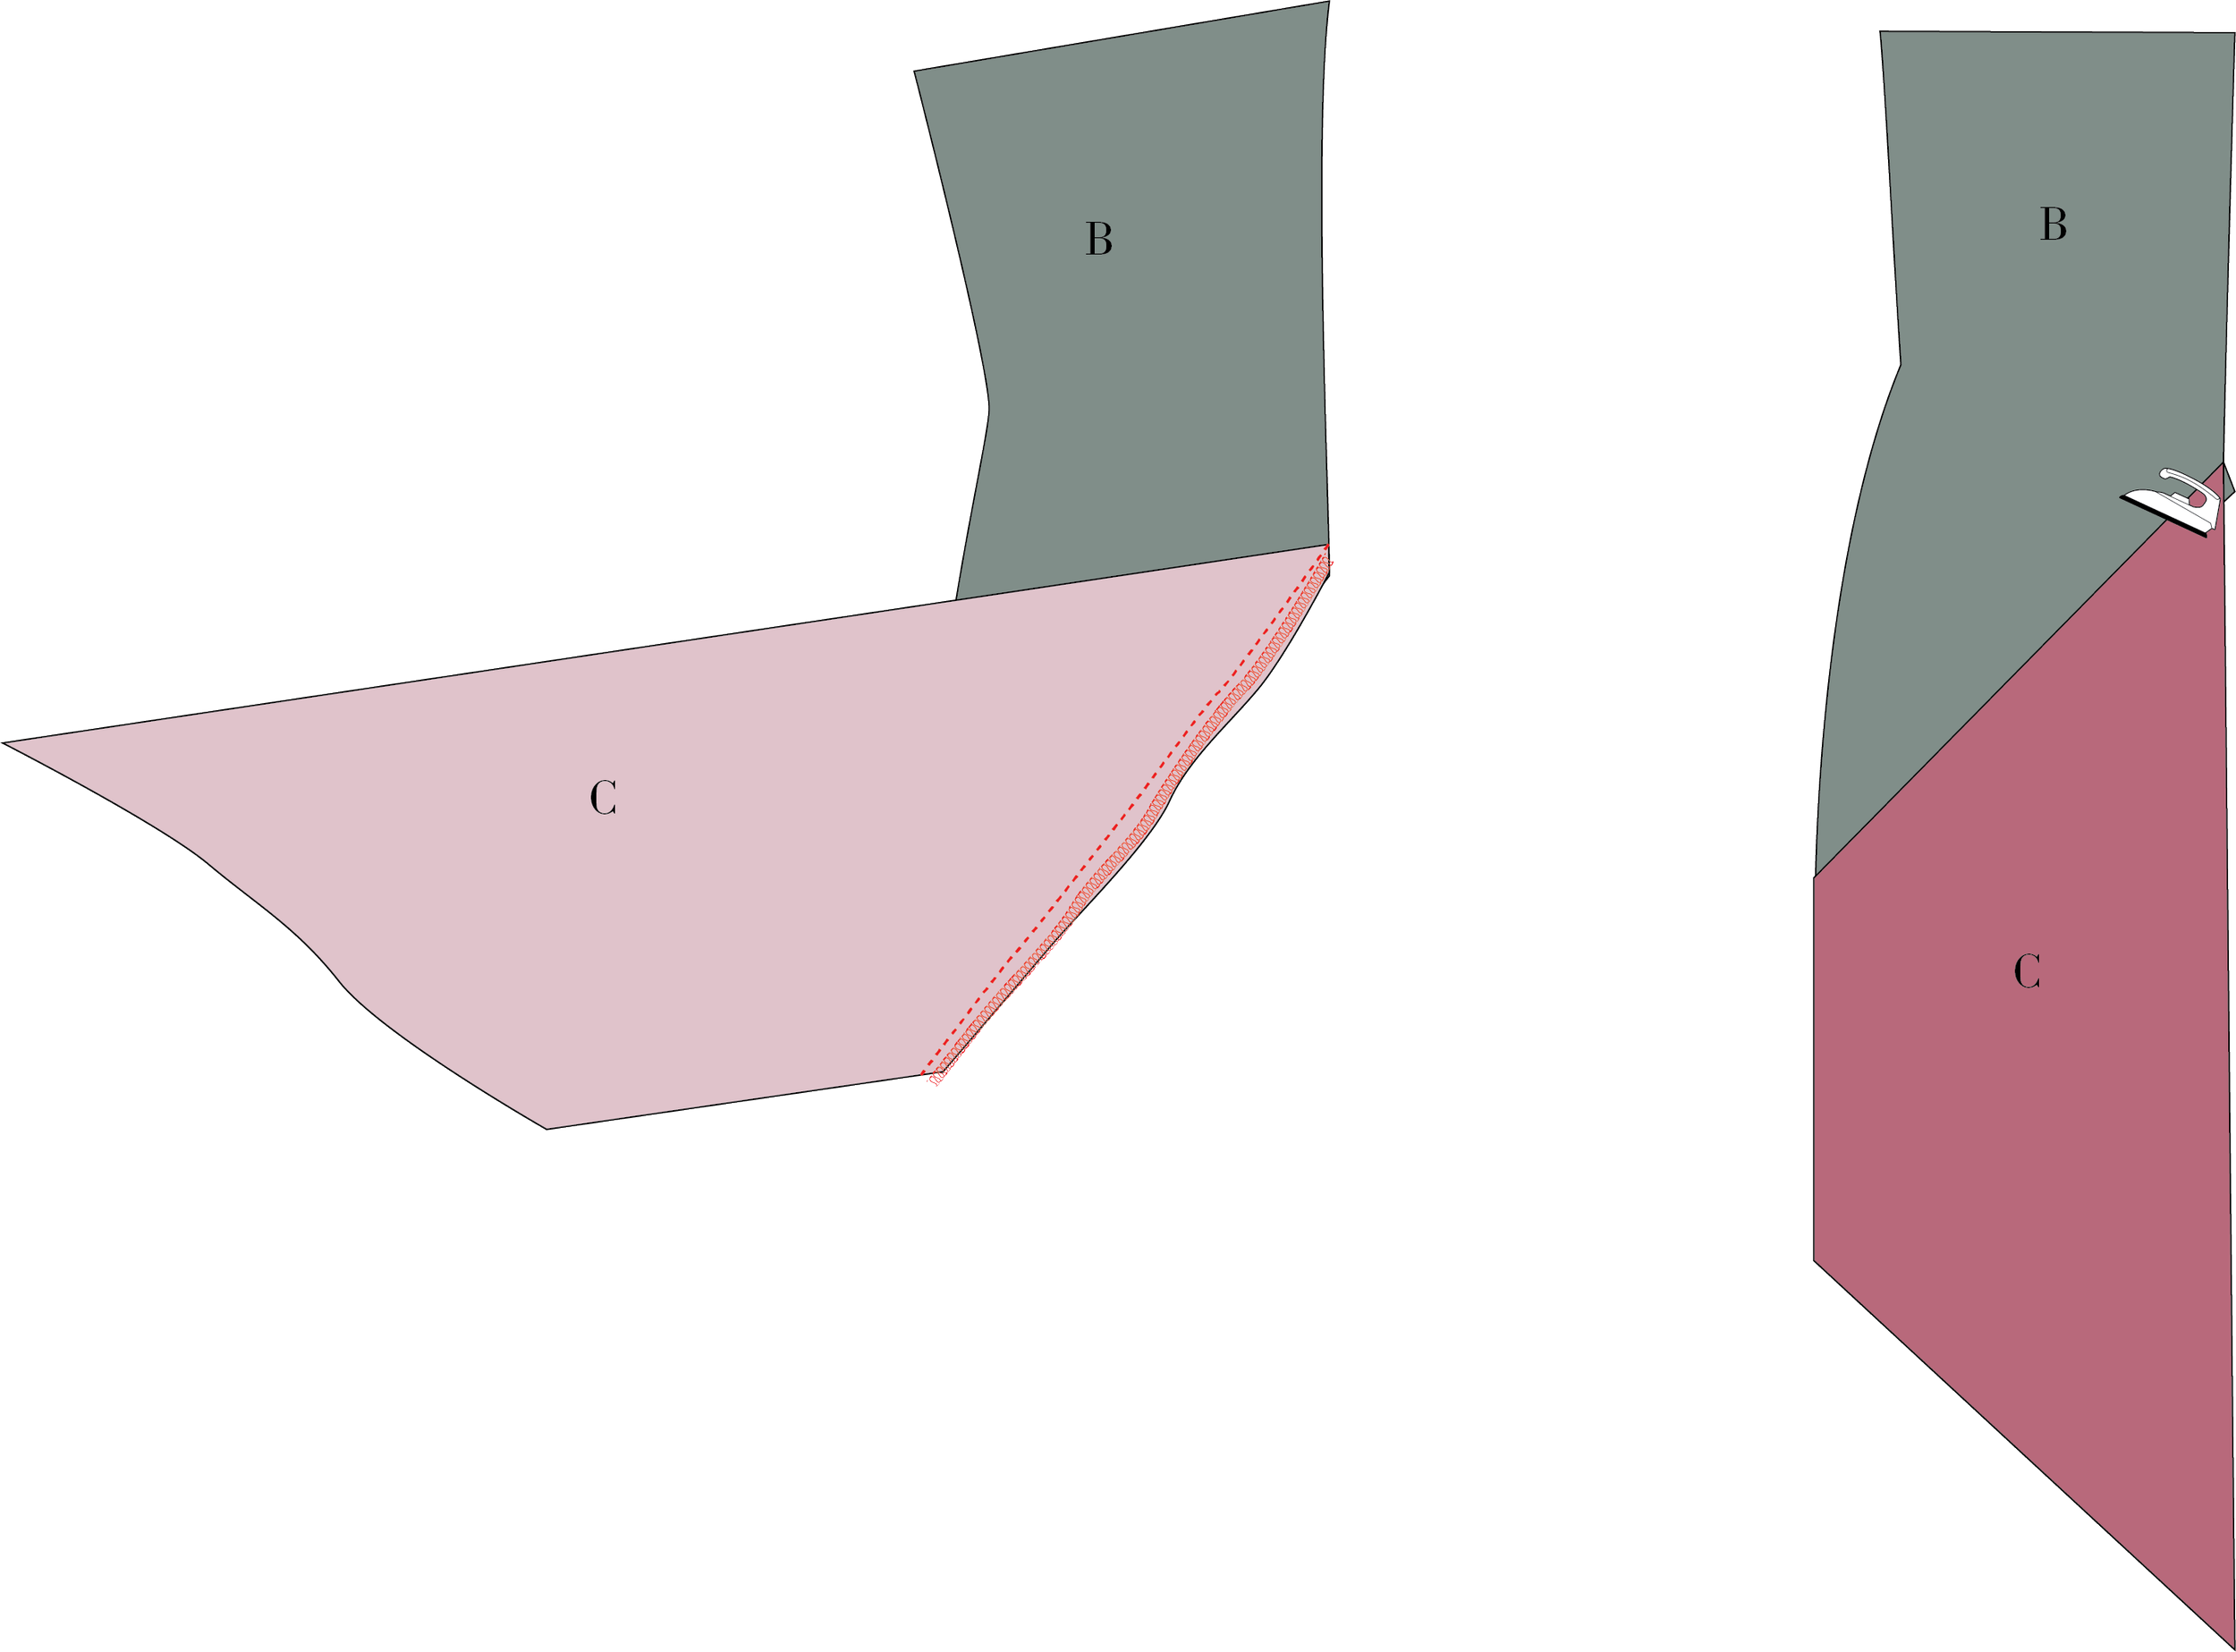
9. Place the pocket bag (C) right sides together along the slanted edge, with only one notch, of the side panel (B). Align the notches to ensure correct placement.
10. Sew the pocket piece to the side panel and finish the seam using overlock, binding, or zigzag stitches. Press the seam towards the pocket piece.
11. Place the slanted edge of the pocket lining right sides together with the pocket opening on the front piece (A). Align the notches on the pocket lining and the front piece.
12. Sew the pocket lining to the front piece, starting at the side seam and stopping at the marking. Backstitch to secure.
13. Clip into the corner of the front piece (A), close to the stitching line, without cutting through the seam.

14. Press the seam allowance towards the pocket. Under stitch the pocket lining to the seam allowance.
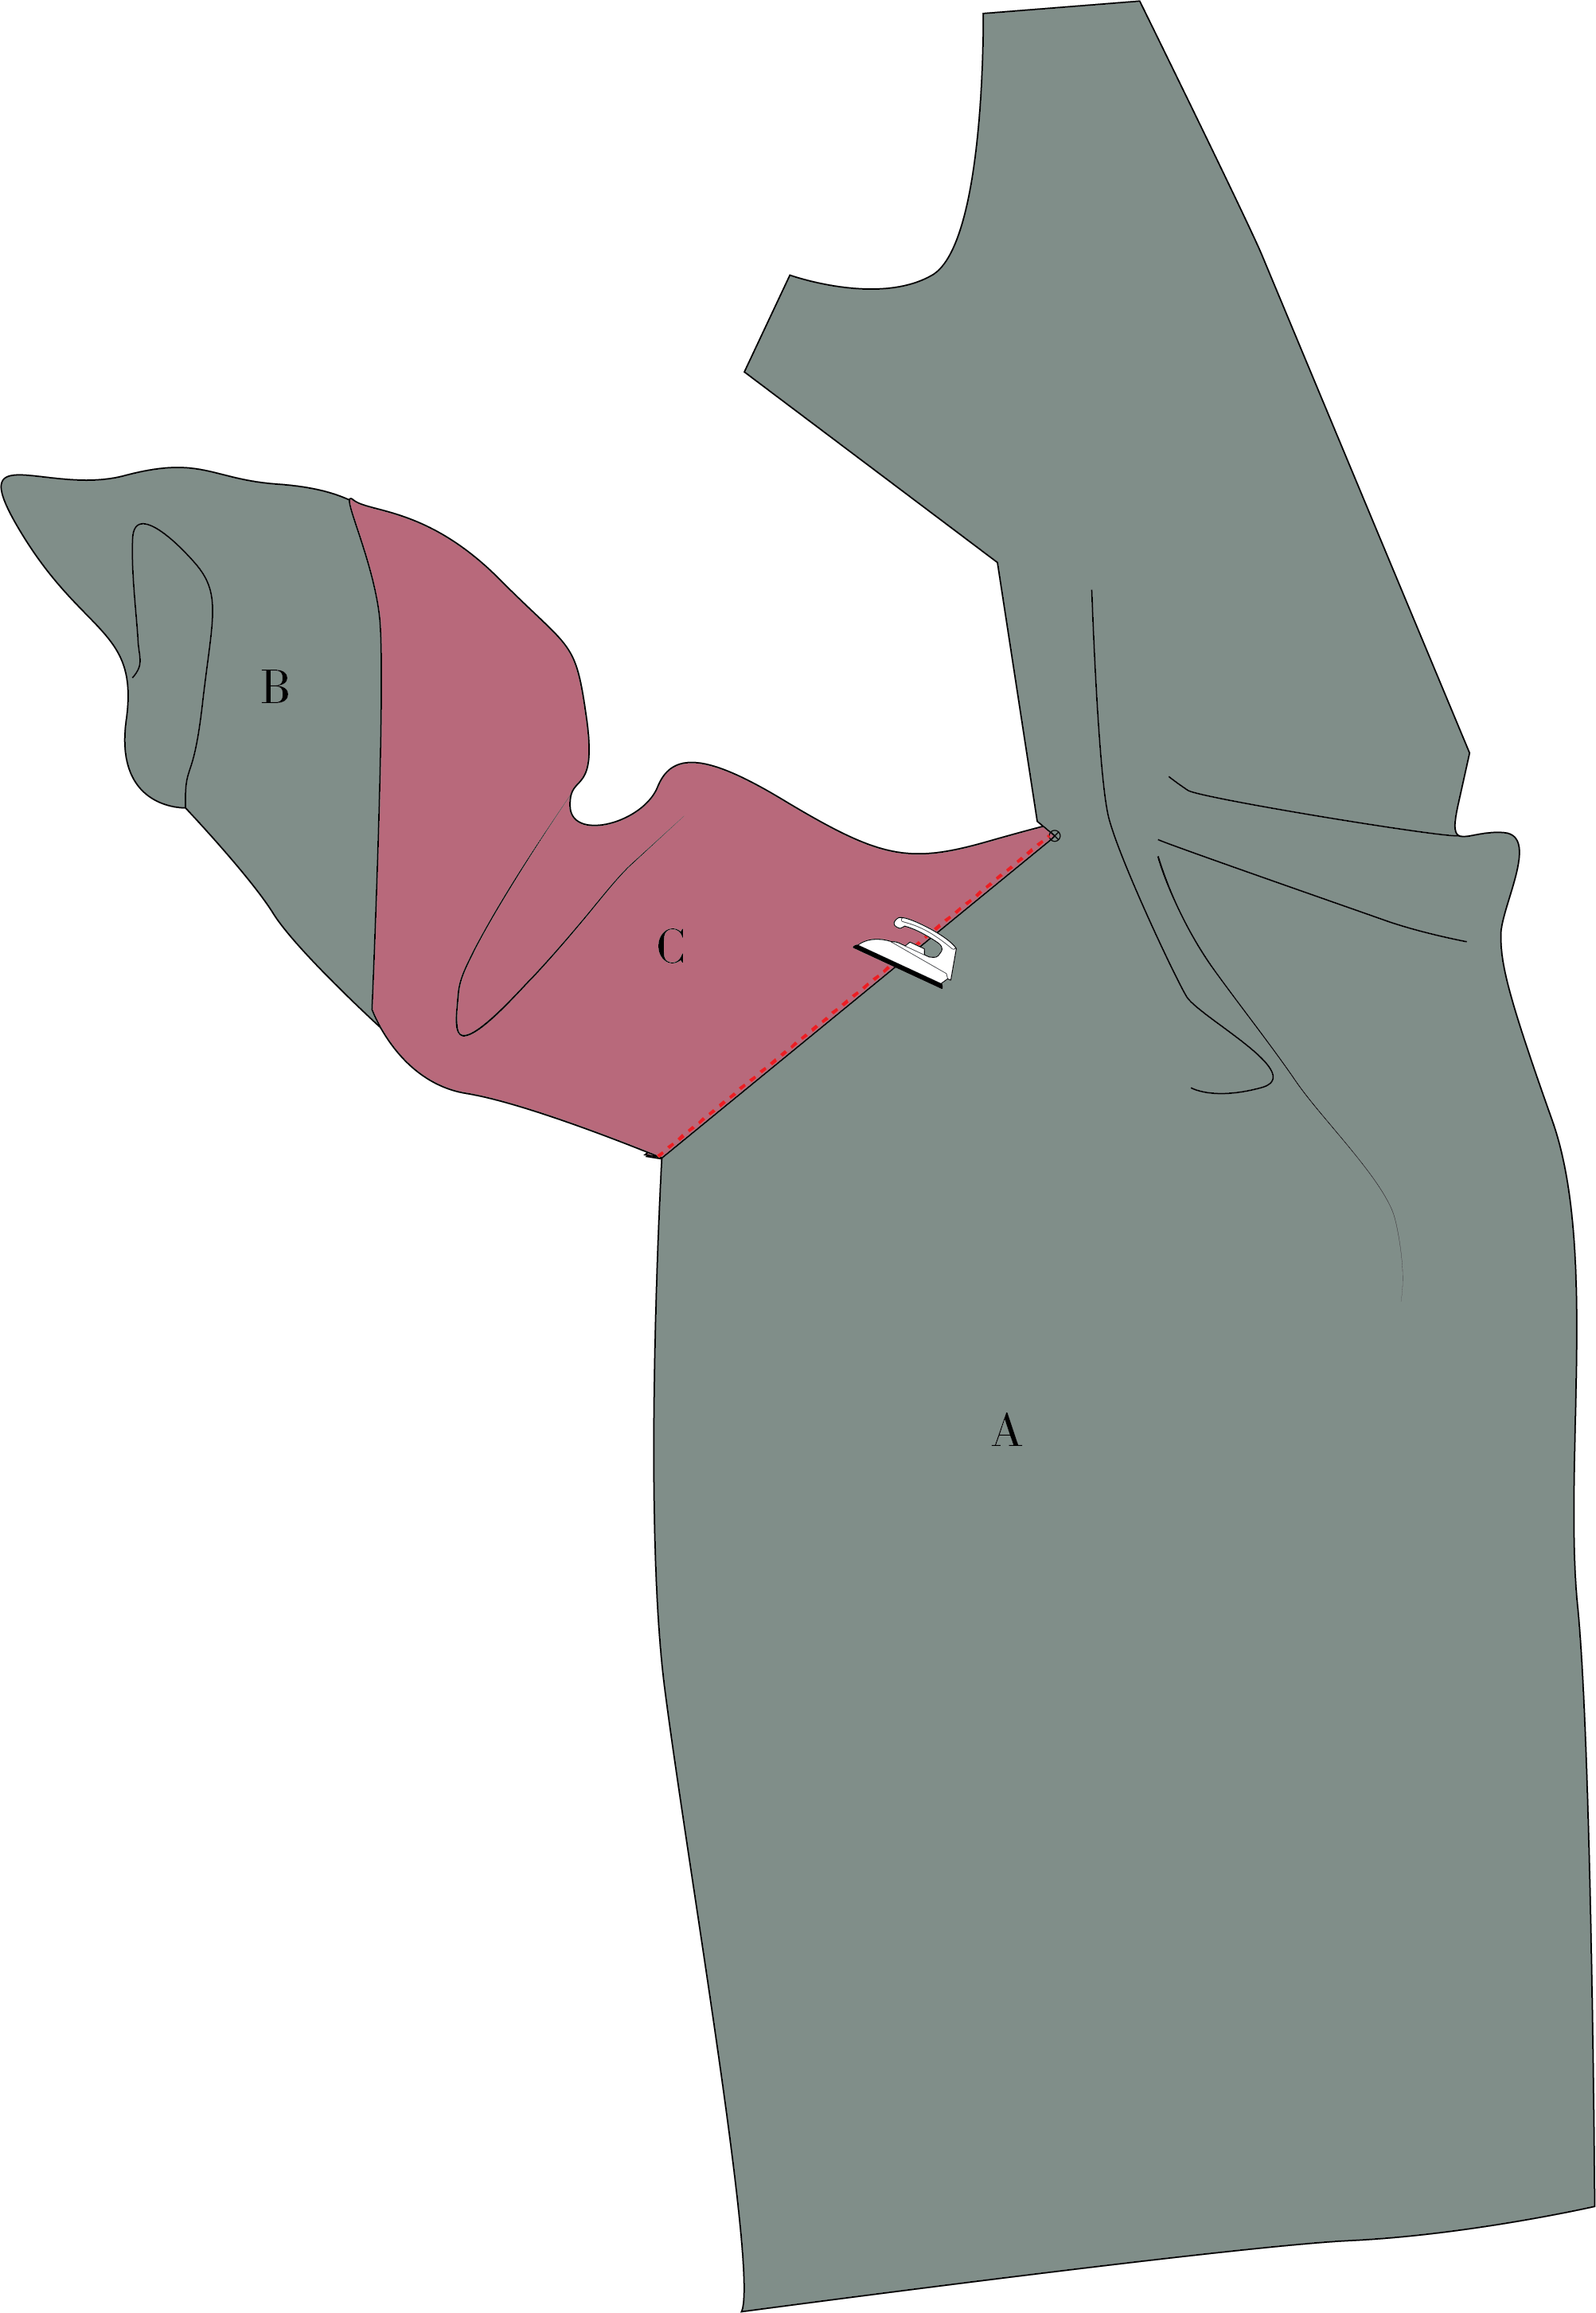
15. Turn the pocket lining to the wrong side of the garment and press the pocket opening neatly.

16. Fold the side panel (B) upwards, aligning it with the front piece (A). Pin the horizontal seam, right sides together, matching the circles.
17. Sew the horizontal seam, starting at the side seam and stopping at the circle. Backstitch to secure.
18. Clip into the corner of the front piece (A), close to the stitching line, without cutting through the seam.

19. Pin the vertical seam of the side panel (B) to the front piece (A), ensuring the pocket bag is properly positioned. Align the notches.
20. Stitch the vertical seam and press it towards the center front. Press the horizontal seam upwards.

21. Turn the front piece (A) to the right side. Secure the pocket by stitching a bar tack (approximately 4 cm long) at the start and end of the pocket opening. This reinforces the pocket opening, making it more durable.

22. Sew the front facing (E) and back facing (F) together at the shoulder seams and then the side seams, right sides together. Press all the seams open.

23. Finish the following seams using an overlocker, binding, or zigzag stitch:
Side panel seams, the horizontal (B) the vertical (B & C).
Center back seam (D).
The outer edge of the assembled facing (E and F).

24. Sew the small waist tie (H) by stitching along the edges that do not have notches, right sides together.
25. Sew the large waist tie (G) by stitching along the edges that do not have notches, right sides together.
26. Clip the corners of both ties to reduce bulk.
27. Turn both ties right side out and press them neatly.

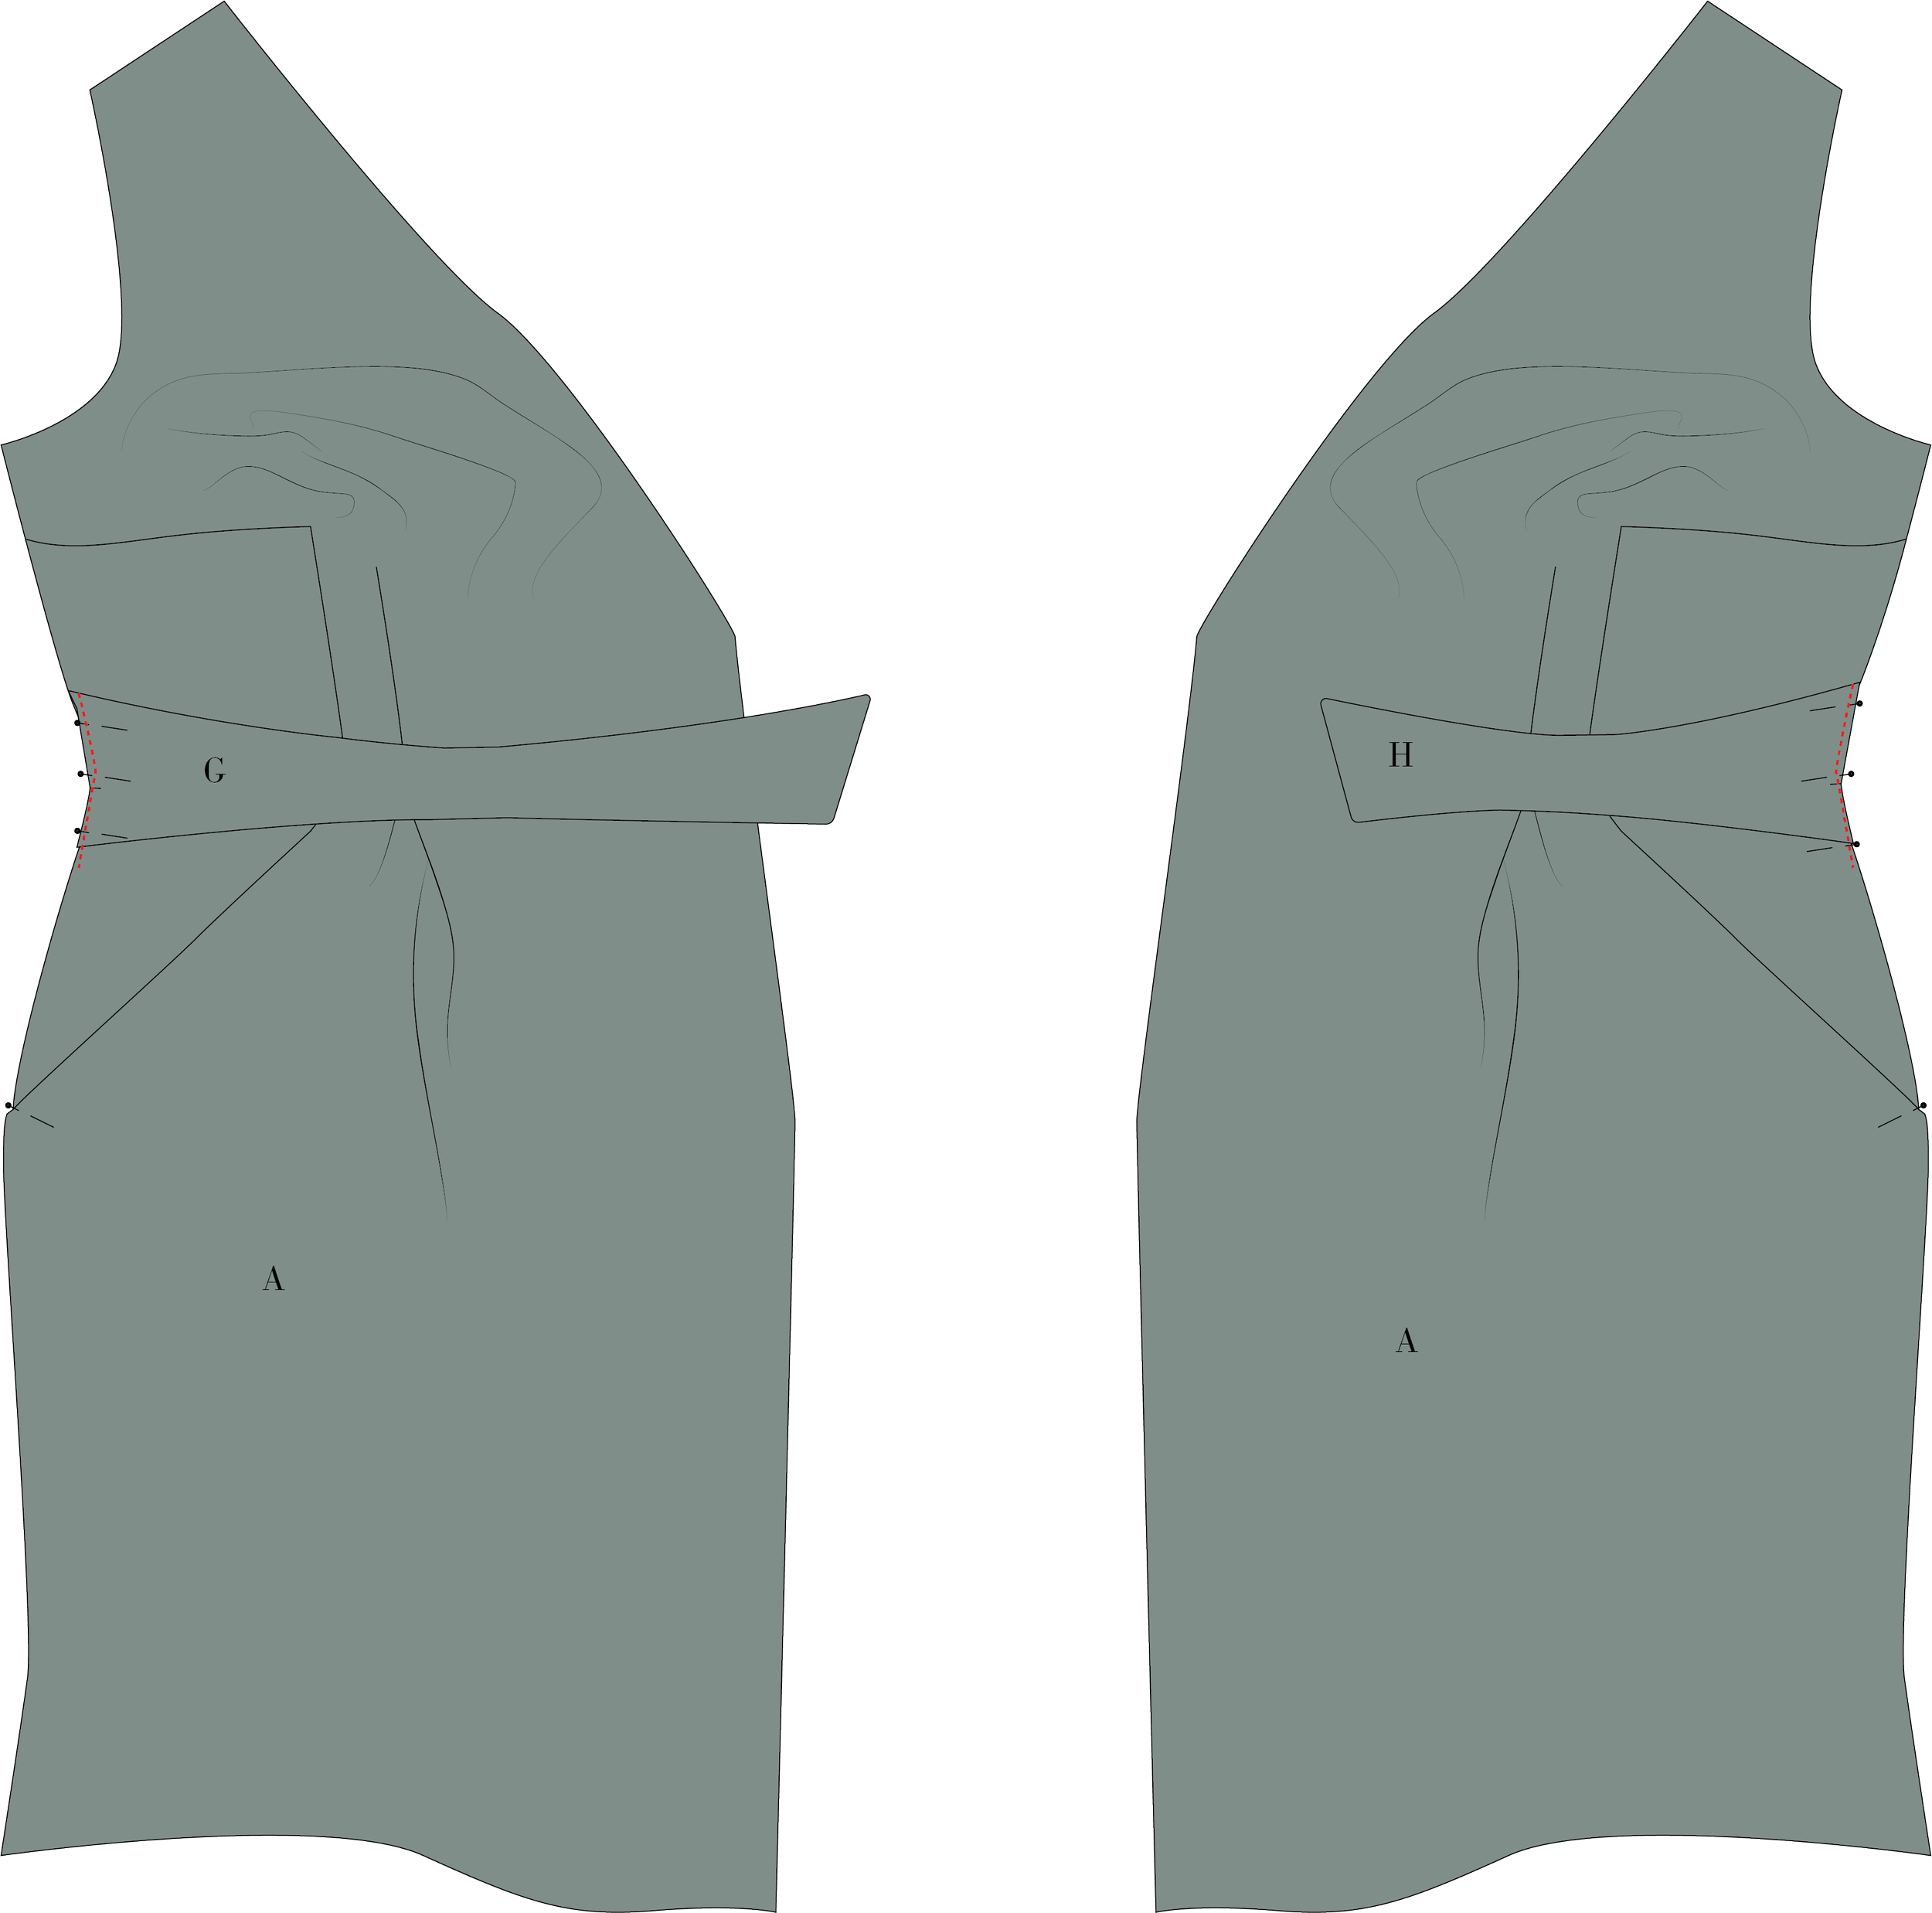
28. Place the long waist tie (G) on the right front, and place it according to the notch in the waist. Pin to the front.
29. Place the short waist tie (H) on the left front, and place it according to the notch in the waist. Pin to the front.
30. Sew the front (A) and back (D) pieces together at the shoulder seams, right sides together. Press the seams open.
31. Sew the side seams of the dress, right sides together, ensuring the pocket bags are included in the seam.
32. Finish the seams using an overlocker, binding, or zigzag stitch. Press the seams towards the back.

33. Sew the center back seam of the dress, right sides together, stopping at the bottom of the slit.
34. Press the seam open. Just before the slit turn the seam allowance of the slit towards the right side. The slit should be 5 cm wide.

35. Place and pin the facing (E and F) to the neckline of the dress, right sides together, aligning the notches and center front. Do not sew the front edges of the facing yet.
36. Sew the neckline, and then press the seam allowance towards the facing.

37. Clip notches into the seam allowance along the neckline curve.

38. Understitch the seam allowance to the facing
39. Pin the front edges of the facing to the front edges of the dress, right sides together. Note that the facing is 3 cm shorter than the dress. Sew the front edge using a 1 cm seam allowance.
40. Clip the corners of the front edge to reduce bulk.

41. Sew the armholes by aligning the front and back facings to the front and back dress pieces at the armholes, right sides together. Note: The armhole facings must be sewn as an all-in-one facing (video tutorial).
42. Turn and press the neckline and front, ensuring the facing sits neatly on the inside of the dress.
43. From the wrong side of the dress, match the facing and dress side seams at the armhole, right side together. Pin and sew the facings and dress together at the armhole seam, working in two steps: one for the front and one for the back.

44. Clip notches into the armhole seam allowance.
45. Understitch the armhole seam allowance to the facing as far as possible.

46. Turn the dress right side out and press the armholes neatly.
HEM AND SLIT
47. Finish the bottom edge of the dress with an overlocker, binding, or zigzag stitch.
48. For the slit, finish as follows:
Underlap: a top stitch along the overlocked edge

Overlap: Fold the hem allowance up 4 cm, right sides together.

Press and sew a vertical stitch along the crease created when pressing the slit earlier. Trim the corner and turn the overlap right side out. Press neatly.

49. Hem the dress and sew using your preferred method:
A visible topstitch 3.5 cm from the folded edge, or
An invisible hem, sewn by hand or machine using a blind hem stitch.

50. Secure the top of the slit by stitching along the diagonal edge of the overlap.

BUTTONHOLES AND BUTTONS:
51. Mark the buttonhole placements on the right front piece (A) as indicated on the pattern. All buttonholes should be horizontal.
52. Sew the buttonholes according to the markings.
53. Sew an additional single buttonhole on the left front piece (A), as illustrated on the pattern.

54. The buttonholes towards the side seam stays closed, sew the button on top.
55. Sew the buttons on to the left front piece, aligning them with the buttonholes on the right front piece.
56. Sew a contra button at the wrong side of the right front piece.
